May 30, 2013

Walnut Serpentine Table - part 1

Well, it's been a crazy few days. But still, I decided to make another serpentine table. And this time I was brave enough to try making it out of walnut!

I love how it turned out. My main concern was that I won't be able to get everything fitted together perfectly and of course I couldn't. But luckily I coloured some filler. Although I didn't need much I still needed it but it did turn out good anyway.

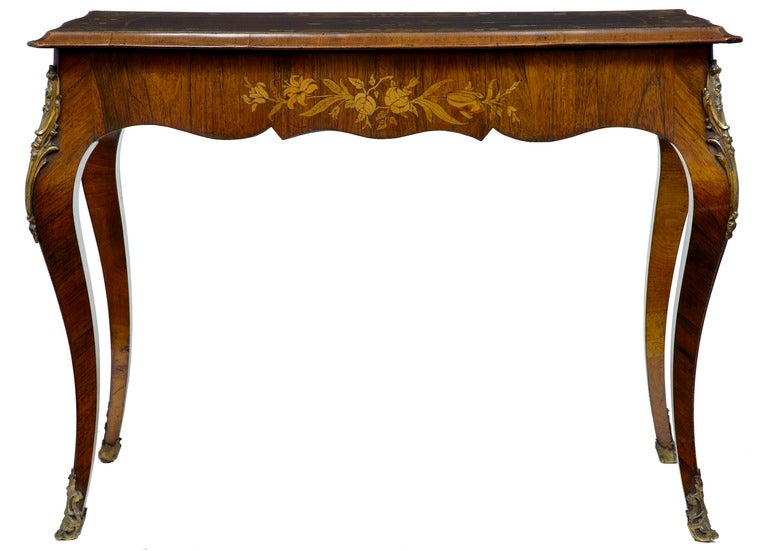
I used a similar design as on the previous serpentine table, although this one is larger. It's 15cm long and 8,5cm deep.

Here you can see the parts that still need some sanding and filling. 


Mixing the filling with a drop of paint. Worked out perfectly!

After all the sanding and filling was done I faced another dilema. How to finish the table? I've been tempted by shellac for a long time, but never got around to quite trying it. We had some flakes and alcohol left over from a while back, when my mum and dad used it for French polishing a few antique pieces of real life furniture. And so I went to the basement and dragged everything out. Not just shellac but also paraffin oil.

They explained the process to me. First use paraffin oil and let it sit for at least 24 hours and after that a few coats of shellac. I won't be able to rub it on like they could but I can still paint it on with a brush. So I decided to try the whole technique on a scrap piece of walnut.

Here you can see the difference in colour, the scrap piece on top of the table is already coated with paraffin oil and the table is not. I love how rich the colour got and the best part, it stays this way!

Shellac flakes. I will have to mix my own shellac but that shouldn't be a problem.


And I also have the alcohol. Thank got we still had this at home, since it's terribly expensive to buy. Who would have thought that something as silly as denaturated alcohol would be so pricey!

Well, now I have to leave the scrap piece to dry and then I can start applying shellac. I decided not to try it straight on the table since I have no idea how this will turn out. I know that shellac finish is amazing but I'm not sure how this will react with being brushed on versus rubbed/polished on. Will have to see and of course I'll report on my progress here :)

Until next time!

*Poof*


May 23, 2013

New toys - making moulds!!

I finally got the mould putty I ordered and today I got to play with it! Thank to Jane over at minifanaticus for suggesting that I make resin stoppers for the potion bottles. It was really a stroke of genius and probably something I would never have thought of. So thank you very much Jane :)

This is truly a magical thing! I already have quite a few ideas what I can make with it, although I'm going to save this for a while since it's quite expensive (again, had to order this from eBay since it seems I can't get anything in my country!)

And these are the moulds I made. Both are stoppers for the potion bottles I made a few weeks ago.

And of course I couldn't wait to pour the resin in the moulds! Here you can see the polymer clay original and the resin ones.

The only thing I can't figure out is why the resin didn't cure clear like it did in the jars.

The skull is supposed to be as clear as the resin inside the Devil's Snare potion. Has anyone had any experience with epoxy resin and does anyone have any ideas why it cured cloudy instead of clear? I would very much appreciate any advice!

It was very difficult to photograph but still I love how this turned out! Of course this is only a temporary mould, a kind of trial and error thing. I will try to make a more decent skull once I perfect the whole procedure. 

There was some leftover resin already mixed so I decided to try mixing in mica powders. It worked great! You can see the difference between the mica powder and food colouring in the right bottle.

And here is the lantern I wrote about in my last post. I bought this for 10€, which is a great deal. I've been looking for something like this for some time now. I want to do a mini scene inside although I'm not sure yet what exactly. I was thinking of putting in some floors/rug, curtain,...
I want to make this for my mum's birthday, which is in one month so I won't be able to be extremely picky now that I don't have the whole day to mess with minis. I was thinking of putting in the table I made last week and maybe some wrapped gifts on the table.... I would love to make some shabby chic style things but my mum doesn't like that style, so they will have to be either natural wood or painted dark like the table.

If anyone has any ideas please save me :) 

Well, this is all for today. Hopefully I will be able to resolve the resin problems soon. 

Until next time!

*Poof*


May 20, 2013

Serpentine table part 2 - finished

And another finished project to show you :) I finished painting the serpentine table I was making last week. All in all I'm very proud of the finished product. Oh, and please excuse the awful pictures. I just couldn't wait till tomorrow to show this to you so I had to photograph it in on my kitchen table in this horrible light. Will post better pictures in a couple of days, when we have nice weather again.


Finished!! It's a very rich dark brown colour. Perfect for a Victorian setting. This is the same colour as my other furniture, the other cabriole leg tables and the Davenport desks.

On top of my next project - a large dining table made from walnut. The next one will be quite bigger, 10cm x 15cm, the measurements were taken from an actual antique table.


The materials - walnut for the next table/tables. Will probably make a slightly different design but overall it will be very similar to the one above. 

Well, I hope to be back soon with more photos, a bit better this time.

Oh, and I also bought a large lantern, which will be perfect for a mini scene. Now to think of what I can put in it..... Will show you pictures of the purchase next time. And I am now officially collecting ideas of that to put inside the lantern :)

Until next time!

*Poof*


May 19, 2013

Serpentine table part 1

I've finally been able to finish the new table I was working on. I love how it turned out and after it is painted it will go to my Etsy shop.

Here is the assembled table but it still needs to be sanded.


The underside...

And after a lot of sanding.


The first coat of paint. Will need a few coats more to finish it.

I'll need to finish this one and then I was thinking of making a similar table from walnut. It would be larger, a large dining table to fit eight chairs, but made out of walnut and only coated with clear varnish, not stained like this one. And of course this would also look great in a shabby chic style. Well, at least I'm not out of ideas :)

Until next time!

*Poof*

May 15, 2013

New table design

These last few days I've been attempting to design a new miniature table. By attempting I mean that I've had a ton of distractions every day and so a project that should be finished in 2 days max turned into a project for the whole week.

First I cut the cabriole legs. These are a slightly different design from my previous tables. They're more curved and a bit thinner.

The table top.... I'm still not sure if I'll leave the corners like this or if I'll do something else with them. The measurements of the top are 10cm x 7,4cm so this could easily pass for a medium sized dining table. If this one turns out ok I'll have to try a larger top, the kind for a large dining room.

And the main difference - the curved skirts. This was the first time I tried something like this and I wasn't entirely sure how it would turn out, but so far it looks great! Now I need to finish the three other sides.

Of course this will still need a lot of sanding after it'll all be fitted together permanently. But so far so good. Oh, and can you spot Tiger on the other side of the balcony? Hehehe....

And just so you can get the feeling of where I got the inspiration, it was a table very similar to this one. The legs aren't the same since I didn't really like these all that much, but other than that a great inspiration. You can find more pictures here.


Hopefully this will get finished in the next few days. Although I'm not so sure since I've finally found a job, hooray!! It's only in the afternoon but still, at least I won't have to worry about income until September, which is amazing. And I've also started writing my thesis so I'll have to see how much time is left for minis. But of course everyone needs time off, and creating miniatures is my relaxation so this blog won't be totally abandoned for the next few months.

Well, until next time!

*Poof*


May 10, 2013

You have to label your jars, or you'll forget what you put in them....

Today I only had time for a quick project and so I've decided to make potion labels. I actually spend over an hour making this really nice label with a nicer swirly border and I was very satisfied with it. But when I scaled it down to size and printed it, it was so light it barely showed on the paper. I don't exactly know why that is, perhaps it's because the lines on the border weren't very thick.... I'll have to try some new borders sometime.

But for today I just made up new potion names and used the label template I already had from my previous attempt at potions from beads.


The labels are big enough to be readable. 


I tried making lids this way but I'm not very satisfied with the result. I also tried one in black but it's not much better. But I did love an idea Jane over at minifanaticus had - to make a few examples from Fimo, then make a mould and then make resin casts. I think that clear "glass" lids would be way better... if I can pull it off that is :)

And I tried photographing the pickled bat again. It looks really great in person.


Just playing with a scene and some of the minis I made..... This will look good all put together someday!

Now I need to wait for mould putty to arrive from the UK next week and then I can make the lids.

Until next time!

*Poof*


May 9, 2013

What's your poison? - New mini delights!

I'm back from my mini break and full of new ideas. We didn't actually go anywhere but it was nice to turn everything off for a few days and enjoy the company of my wonderful boyfriend. We did go hiking one day and to the movies another, but other than that we had a few lazy days.

But I got a new toy in the mail yesterday so back to minis it is :)

Epoxy resin!! I've wanted to buy this for quite some time and I finally ordered this one last week. So of course I had to play with this right away! 

These were the trial potions. The instructions say you shouldn't pour the resin more than 3mm thick but I've seen people filling whole mini bottles in one shot so I decided to experiment. All of these dried perfectly fine. Perhaps the one that's completely filled isn't as hard in the bottom but it really doesn't matter. This won't run and there isn't any change in colour.

And this is my messy workspace from today. I had a ton of paper towels all over the place, hahaha. I used small syringes to get the resin inside the bottles and small cups to mix it in. I added food colouring to get different colours and it turned out beautifully. I read that epoxy resin shouldn't be mixed with acrylic paint and since I don't have any oil based paints at home this was the alternative. Has anyone tried colouring resin with acrylics? I'd love to know if it's ok to do so.

A small pickled bat. Sadly this was the best picture I could get but you can just make out his crossed little wings. 

Some gillyweed :) Or if you prefer, some artificial moss added to the jar.

And just plain coloured ones. The one on the left was a failed attempt with epoxy glue, it turned orange after it dried even though I added purple glitter. So I just decided to fill it with some leftover resin from today. 

And I also filled a cauldron. I'll have to work on the cauldron, I decided at the last minute that I wanted to fill it when I already had the resin mixed so I was in a bit of a hurry. 

These now need labels and lids. I already made some lids but am still deciding on the colour.... I tried black, silver and antique gold but there always seems something off..... any suggestions? I thought about making cork stoppers but then decided against it.

Well, now I need to think of some names for the new concoctions :D Again, if anyone has any suggestions please feel free to contribute!

Until next time!

*Poof*


May 1, 2013

New wall shelf design

Another wall shelf design right out of the oven :)

This one is a bit different but I like it anyway. Perhaps this one would be nice in black?


And the other two I made last week. I would also like to thank all of you for your input, it means a lot and I like hearing what other miniaturists think. I decided to stain these two a dark brown colour, like the Davenport desk and cabriole leg tables.


Please excuse the horrible pictures, I will hopefully be able to take better ones in the next days.

Now I think I will take a few days off, since we have extremely lovely weather and my boyfriend has the week off. Enjoy this lovely spring while you can, I have a feeling that summer isn't far away.

Until next time!

*Poof*