Showing posts with label bottles. Show all posts

December 2, 2014

A magazine publication, an exhibition and mini updates

Well, November has slipped by and we're already counting down the days 'till Christmas. Remember when I thought that I'd have a bit more free time after the wedding? Turns out it's not exactly so.

Since it's next to impossible to get a real job here at the moment I thought I'd put my crafting to good use and started making cards. Just Christmas cards for now but I do plan on making all kinds, for birthdays, anniversaries, weddings,.... I have to say the response is quite good and so I've been buried in paper and glue for the most part. And I even got an early Christmas present....a Sizzix Big Shot machine!!! For those of you who aren't familiar with it it's an embossing and cutting machine and you can do wonders with it!

Ok, enough non-mini related talk.

****************

I have some exciting news!! 

I got my first item published! In the December issue of The Dolls' House Magazine you can find my mahogany serpentine table!!!! I'm so excited and grateful for this opportunity. When the magazine contacted me in the summer I couldn't believe it and didn't dare tell anyone other than my husband. I'm the kind of person who only believes something when I see it.... so last week I finally got the magazine and sure enough there it was - my table!! Even though it's only one photo I'm still very very proud!

And some more exciting news - the local library will host an exhibition of my miniatures in January!! I'm very excited since I'd like to get more people interested in this hobby here. And this is a great way to show off my hard work :) And just like my friend Jane said in one of her blog posts.... we need to stop complaining about our communities not being interested in our hobbies and show them off. We'll never know who might be interested in the same things as us if we don't let ourselves be noticed :)

****************

I did have some time to work on minis this past month but not enough time to upload anything. So I finished the little corner vignette I used for my steampunk pipe tutorial... I haven't really had a lot of time to take pictures but here are a few half decent ones for now.

 It's a magical office where I can imagine a sorcerer working on a manuscript or warming his hands by the stove. Perhaps he's feeding his pet snail? Although I think he forgot and the snail will eat all his magical mushrooms, hahaha!

I think the firewood adds a nice touch...

I also had some time to think about how best to furnish my house. First of all I finally decided on a name - Featherstone's Village Shop. It's going to be a magical shop filled with all sorts of books, potions, scrolls, quills,.... Basically the shop will have a bit of everything, including an exclusive stand from Honeydukes :) At least that's the plan.

I thought it would be fun to include a snap of my worktable. It's unusually clean...

A corner shelf unit that will be behind the counter. You would think these shelves were a built in an hour but they took a lot longer and although I had fun making them they took me a whole weekend with the drawers included.

Here are a few drawers complete... It actually has all the drawers made but I didn't manage to take a decent photo yet. It gets dark so soon now and my worktable isn't all that well lit.

I played around with a few parcels for Featherstone's. Each parcel will have a shop label on them.

I also made some new potion jar labels. It's so tiny you can barely see it but each label has the shop's name on it :) Thankfully the camera picks up quite a few details.

My latest project is another corner vignette.... this time I decided to focus on something non magical. I had an idea for an artist's studio for quite some time and after seeing a few wonderful tutorials for art supplies I decided it's about time to stop thinking about it and just make it.

A few palettes, they look well used :) I loved making these! They are really fun to make and I couldn't resist making a few of them.

This easel turned out better then expected. Granted it's not exactly sturdy but I think it looks great for a first try. Now all it needs is some canvas.


Well, my December started off great and I hope yours did too! I hope to post some more updates soon since I still have a few more ideas to finish for the exhibition. 

I wish you all a great December!!

Until next time!

*Poof*


October 24, 2014

Turning miniature pieces can be done on a big lathe too :)

First of all I would like to thank each and every one of you for taking the time to comment on my blog and to everyone for all of your wonderful wishes and lovely comments on pictures from our wedding.

Well, things seem to have calmed down a bit on my end. Now with the wedding over and all the details taken care of after the wedding I have more time for miniature projects.

I have finally convinced my father to let me try turning miniature pieces on his big lathe! After 2 years of convincing he finally gave in. And I couldn't be happier! It's actually the same as a tabletop lathe, the only difference is that I have to stand when I work. And now I can stop drooling all over tabletop lathes every time we go to the hardware store :)

After a crash course in safety on the big lathe and how to handle the chisels I am now successfully making miniature turnings! Yaaaay!

My first attempt was a bit timid from all the years my father spent saying that his big machines were scary and not for me :P I think he used to say that when I was little, because even then I was always curious about everything and his machines always fascinated me - and you know how kids are when something interests them.... of course he had to scare me a bit so I wouldn't be tempted to try turn one on, hehehe

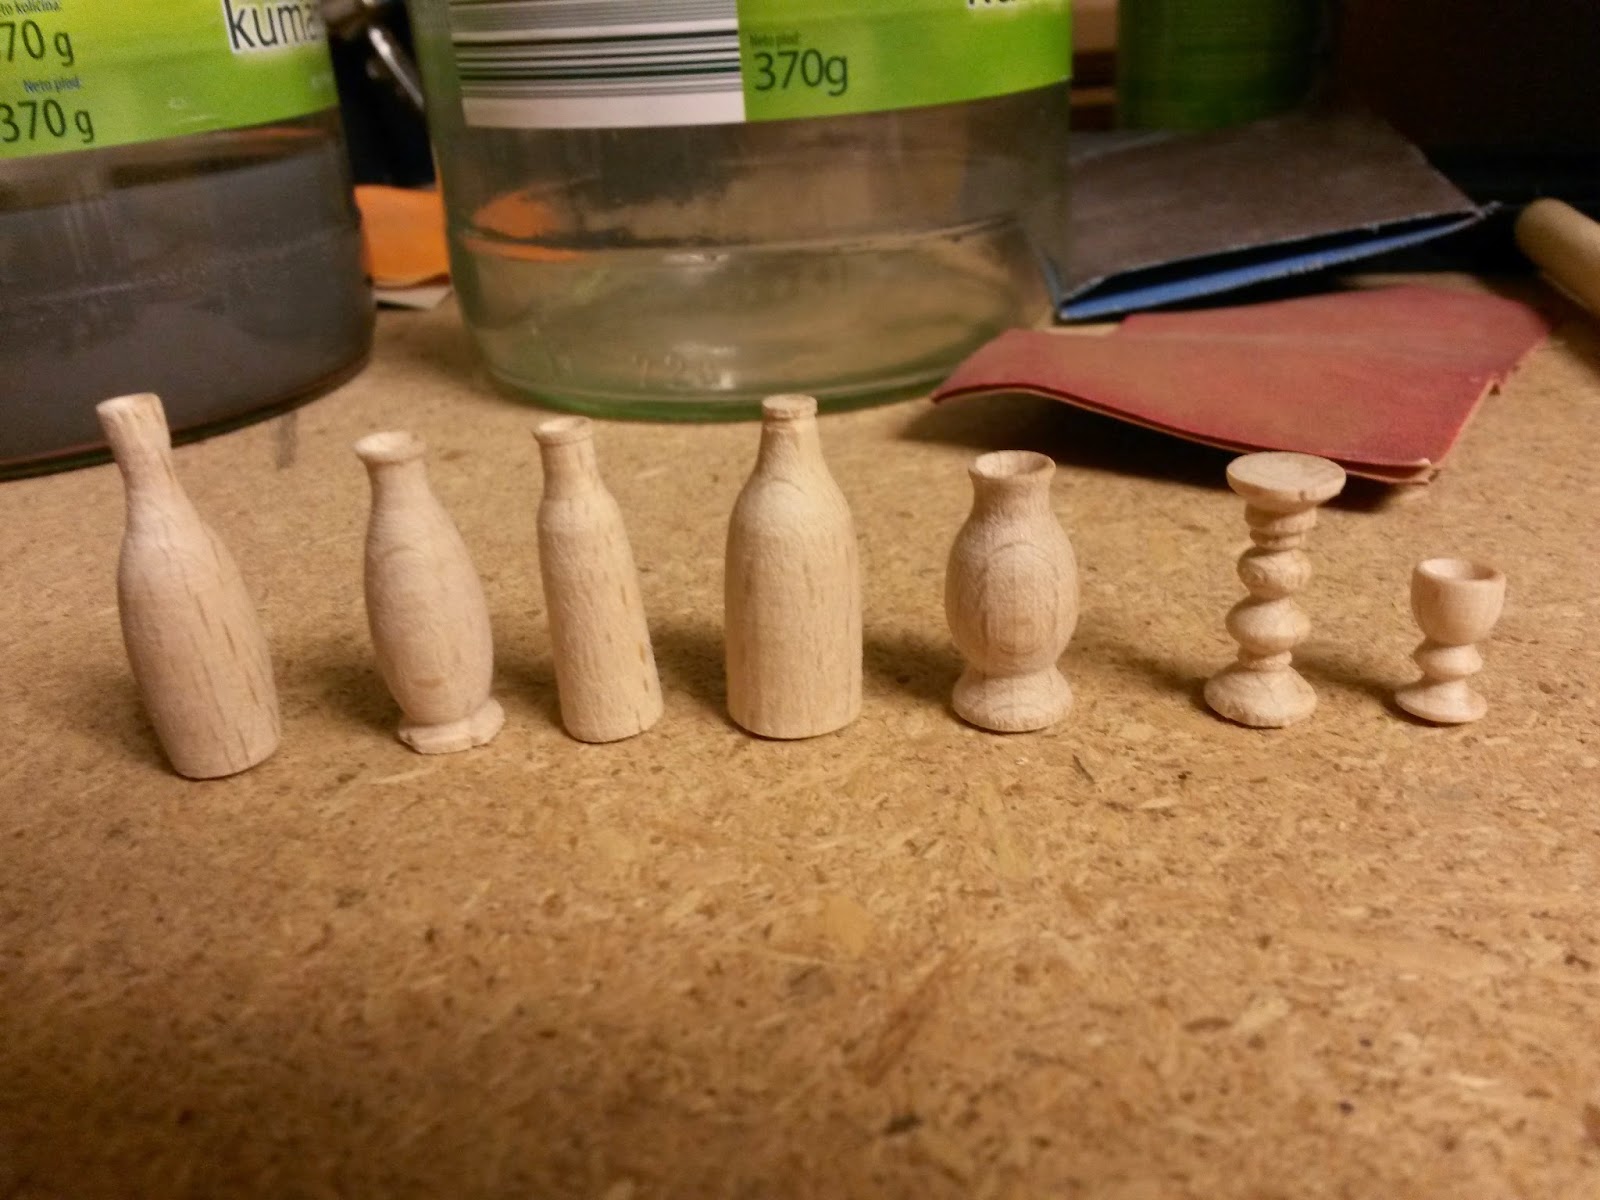
Anyway, after the first bottle was done I got a bit bolder and tried new shapes. I'm not afraid of the lathe anymore and now I can make so many different items. For now I can only make things from pre-made poles. We had a part made so I will be able to turn table legs and such. My father has parts that are for turning bigger things and so we needed something smaller. We're still waiting for that but hopefully we'll get it next week.

The big and scary lathe :)


First batch of turnings. For some reason I wanted to make bottles.... the fourth bottle is my first try. I was still very scared to put the chisel to the wood and it shows. It's too bulky and it doesn't look good at all. The next pieces are progressively better though.... I'm no expert by a long shot but at least things are starting to look somewhat normal.

And a batch of candle stands. There are so much fun to make! I can't wait to make some more!

As you can see I still have a lot to learn when it comes to turning wood.... and miniatures in general. But I'm having fun creating and learning!

***********

In other news.... my father and I also did some work on my Victorian shop. 

We put the carcase together. I searched all over on the best ways for applying wallpaper and there are a lot of different opinions.... But in the end I decided we should just put the entire thing together and I'll wallpaper it then.

The front of the house. It's starting to look good! It still needs a lot of ageing and distressing but so far so good.

We also added the side columns. It totally changes the entire front.

The ground floor ceiling. The only thing I made before we assembled the house. I'm probably going to regret not doing the upper ceiling before but I don't have anything special planned for that one. Will probably just paint it before wallpapering. But I love how this one turned out!

I couldn't resist taking a shot through the window :) You can also see some of the ceiling. I can't wait to start putting furniture in! Everything is going to be very nicely visible though the window. 

I'd love to know what you all think - both about the turnings and the house. 

Now I have a question.... does anyone have any advice on how to make an aged setting. Both inside and outside. Or does anyone perhaps know of a site that explains it a bit? I'd love to see some distressing tutorials and such, to get the most realistic effects. I tried searching on the web but uncle Google came up empty handed. Or I didn't search for the right phrases. And tips and suggestions will be greatly appreciated.

Until next time!

*Poof*


April 18, 2014

My miniatures through the eyes of a professional photographer

Remember the amazing photos my friend took of my minis? Well, she sent me a new round. Again, I was speechless when I saw them. My fiance said they're worth more than gold since they got me to shut up for a few minutes, hahah. He was kidding.... I think he was kidding.... I hope he was kidding, hahha.

I would like to thank everyone for the lovely comments. It means so much to know that people enjoy my work since I love sharing my process and end results with all of you.

Of course these photos were again taken by the fabulously talented Inaya. You can also find her on facebook. And now without further ado....


What do you think? Amazing, right? These are all things you've already seen on this blog. Isn't it interesting how they can look so much better this way? I don't think I'll ever stop admiring them :) Thank you again Inaya!!

In other news....

Recently I've had some time to set up a facebook page. You can find the link on the right side of this blog or just click here. Just in case you don't want to miss any blog updates or are curious to see more WIP photos. I have decided to post occasional snapshots of my worktable there that won't be on the blog. If you're interested head on over and take a look. I will also have another giveaway only for facebook in the very near future so keep an eye out for that also.


I wish everyone a very happy Easter with lots of colourful Easter Eggs :)


Well, until next time!

*Poof*

June 4, 2013

The Sorting Hat!! + an update on the serpentine table finish

In between waiting for the shellac to dry on the table I had a bit of time yesterday and so I decided to finally try making a Sorting Hat (you know, from Harry Potter *wink*). I'm not exactly what one would call talented with clay but I did manage to make something resembling a hat. I'll let you decide if it's any good :)

I didn't have any brown clay so I made him from some scrap clay and painted him. Do you think this could be the sorting hat (somewhere deep in a corner of a roombox)?

I also made some bottles. Nothing too fancy or elaborate but with stickers on they might look passable. With a bit of colour of course.

The one I really liked was this one and so I tried making a mould and casting in plaster instead of resin. It worked! I might make some more of these, to fill a shelf with eventually. It will need a light sanding and a coat of paint (not sure what colour yet though) and with a sticker it'll be a good filling for shelves in the future.

And an update on the table..... you can see the difference in finish on the scrap piece and on the table. The table has a second coat of shellac and the scrap piece has five coats. The scrap piece is also polished with special shellac polishing oil for a little extra shine. It's not shiny enough to be able to see your reflection in but it is a nice semi gloss. I think this is quite enough shine for the table. Now I only need to apply three more coats of shellac on the table.

I probably didn't mention the foul smell shellac has. Well, actually the alcohol has a distinct smell.... but that isn't all that bad if you compare it to the polishing oil. The oil has lavender in and so the smell is almost unbearable - for me at least, since I detest lavender and get nauseous every time I smell it. I guess I'll have to do the final polish on the table outside.

Hopefully tomorrow the table will be finished and then I'll have to start writing my thesis (I will, seriously, I swear! :D)

Until next time!

*Poof*


May 23, 2013

New toys - making moulds!!

I finally got the mould putty I ordered and today I got to play with it! Thank to Jane over at minifanaticus for suggesting that I make resin stoppers for the potion bottles. It was really a stroke of genius and probably something I would never have thought of. So thank you very much Jane :)

This is truly a magical thing! I already have quite a few ideas what I can make with it, although I'm going to save this for a while since it's quite expensive (again, had to order this from eBay since it seems I can't get anything in my country!)

And these are the moulds I made. Both are stoppers for the potion bottles I made a few weeks ago.

And of course I couldn't wait to pour the resin in the moulds! Here you can see the polymer clay original and the resin ones.

The only thing I can't figure out is why the resin didn't cure clear like it did in the jars.

The skull is supposed to be as clear as the resin inside the Devil's Snare potion. Has anyone had any experience with epoxy resin and does anyone have any ideas why it cured cloudy instead of clear? I would very much appreciate any advice!

It was very difficult to photograph but still I love how this turned out! Of course this is only a temporary mould, a kind of trial and error thing. I will try to make a more decent skull once I perfect the whole procedure. 

There was some leftover resin already mixed so I decided to try mixing in mica powders. It worked great! You can see the difference between the mica powder and food colouring in the right bottle.

And here is the lantern I wrote about in my last post. I bought this for 10€, which is a great deal. I've been looking for something like this for some time now. I want to do a mini scene inside although I'm not sure yet what exactly. I was thinking of putting in some floors/rug, curtain,...
I want to make this for my mum's birthday, which is in one month so I won't be able to be extremely picky now that I don't have the whole day to mess with minis. I was thinking of putting in the table I made last week and maybe some wrapped gifts on the table.... I would love to make some shabby chic style things but my mum doesn't like that style, so they will have to be either natural wood or painted dark like the table.

If anyone has any ideas please save me :) 

Well, this is all for today. Hopefully I will be able to resolve the resin problems soon. 

Until next time!

*Poof*