Showing posts with label Victorian shop. Show all posts

October 24, 2014

Turning miniature pieces can be done on a big lathe too :)

First of all I would like to thank each and every one of you for taking the time to comment on my blog and to everyone for all of your wonderful wishes and lovely comments on pictures from our wedding.

Well, things seem to have calmed down a bit on my end. Now with the wedding over and all the details taken care of after the wedding I have more time for miniature projects.

I have finally convinced my father to let me try turning miniature pieces on his big lathe! After 2 years of convincing he finally gave in. And I couldn't be happier! It's actually the same as a tabletop lathe, the only difference is that I have to stand when I work. And now I can stop drooling all over tabletop lathes every time we go to the hardware store :)

After a crash course in safety on the big lathe and how to handle the chisels I am now successfully making miniature turnings! Yaaaay!

My first attempt was a bit timid from all the years my father spent saying that his big machines were scary and not for me :P I think he used to say that when I was little, because even then I was always curious about everything and his machines always fascinated me - and you know how kids are when something interests them.... of course he had to scare me a bit so I wouldn't be tempted to try turn one on, hehehe

Anyway, after the first bottle was done I got a bit bolder and tried new shapes. I'm not afraid of the lathe anymore and now I can make so many different items. For now I can only make things from pre-made poles. We had a part made so I will be able to turn table legs and such. My father has parts that are for turning bigger things and so we needed something smaller. We're still waiting for that but hopefully we'll get it next week.

The big and scary lathe :)

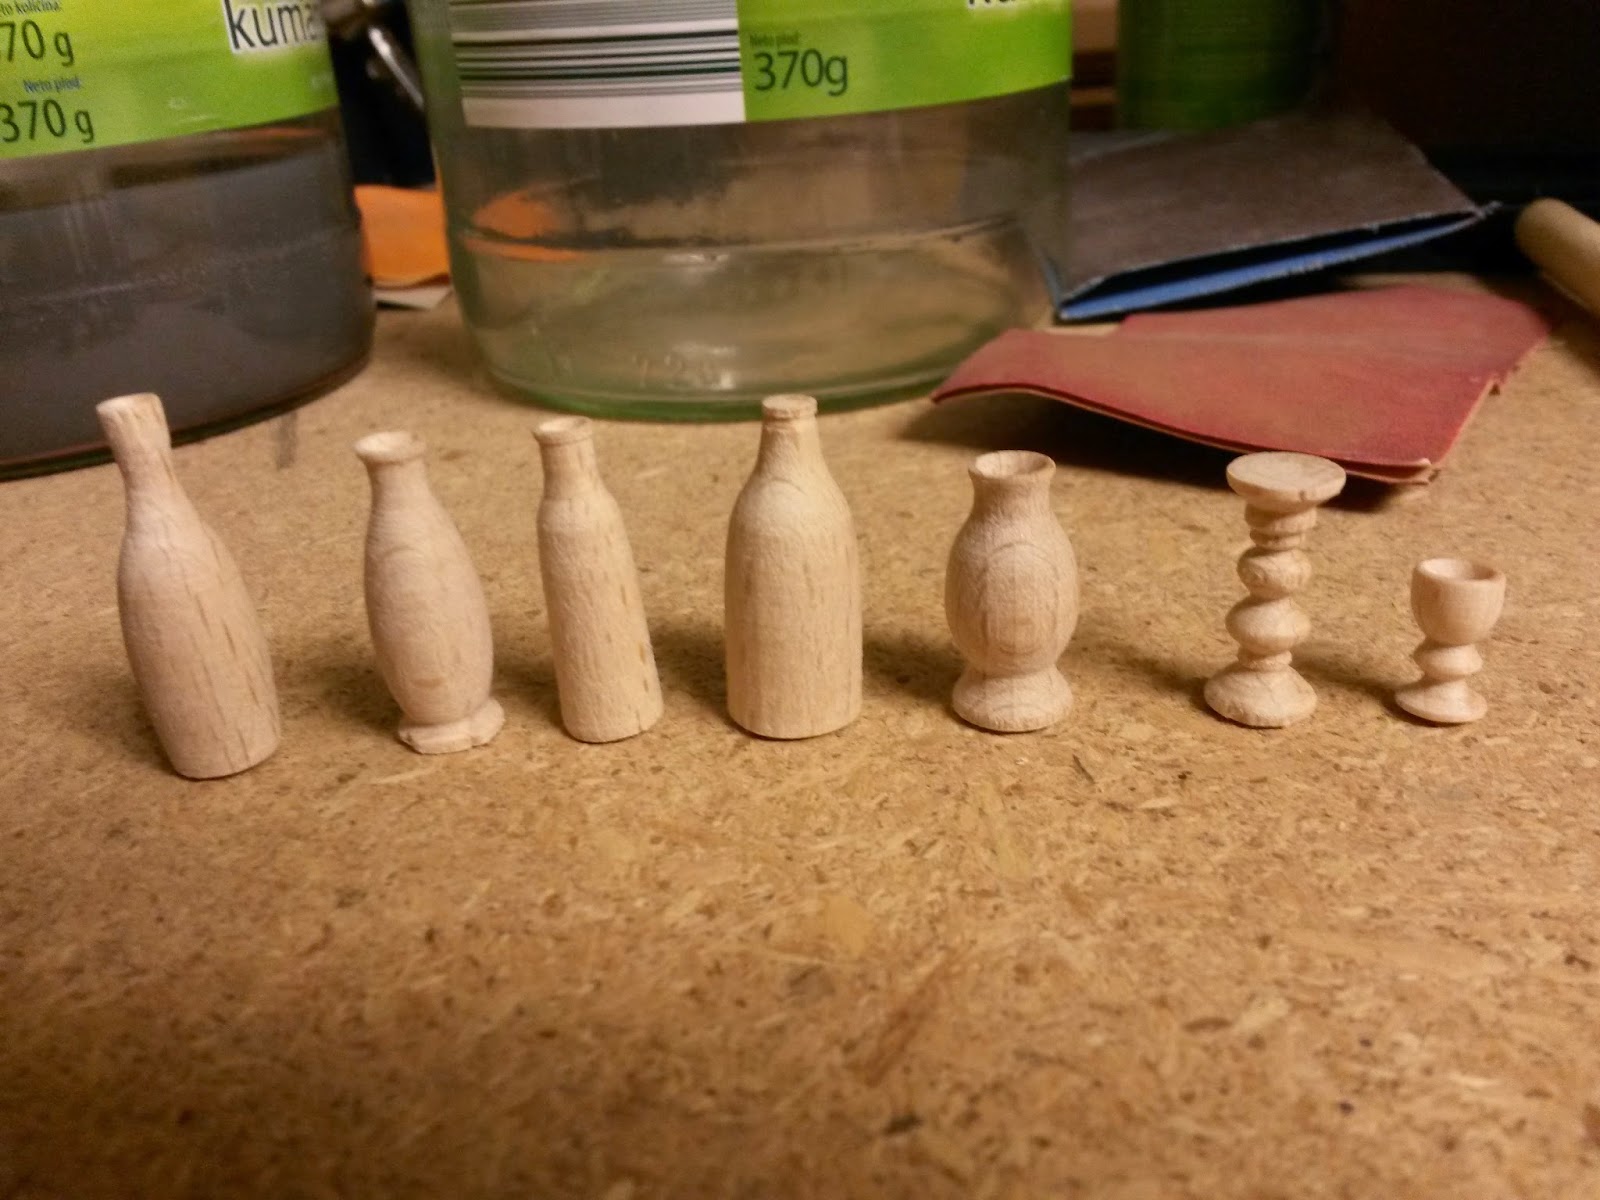
First batch of turnings. For some reason I wanted to make bottles.... the fourth bottle is my first try. I was still very scared to put the chisel to the wood and it shows. It's too bulky and it doesn't look good at all. The next pieces are progressively better though.... I'm no expert by a long shot but at least things are starting to look somewhat normal.

And a batch of candle stands. There are so much fun to make! I can't wait to make some more!

As you can see I still have a lot to learn when it comes to turning wood.... and miniatures in general. But I'm having fun creating and learning!

***********

In other news.... my father and I also did some work on my Victorian shop. 

We put the carcase together. I searched all over on the best ways for applying wallpaper and there are a lot of different opinions.... But in the end I decided we should just put the entire thing together and I'll wallpaper it then.

The front of the house. It's starting to look good! It still needs a lot of ageing and distressing but so far so good.

We also added the side columns. It totally changes the entire front.

The ground floor ceiling. The only thing I made before we assembled the house. I'm probably going to regret not doing the upper ceiling before but I don't have anything special planned for that one. Will probably just paint it before wallpapering. But I love how this one turned out!

I couldn't resist taking a shot through the window :) You can also see some of the ceiling. I can't wait to start putting furniture in! Everything is going to be very nicely visible though the window. 

I'd love to know what you all think - both about the turnings and the house. 

Now I have a question.... does anyone have any advice on how to make an aged setting. Both inside and outside. Or does anyone perhaps know of a site that explains it a bit? I'd love to see some distressing tutorials and such, to get the most realistic effects. I tried searching on the web but uncle Google came up empty handed. Or I didn't search for the right phrases. And tips and suggestions will be greatly appreciated.

Until next time!

*Poof*


September 1, 2014

Pre-wedding jitters?? Pre-wedding nervous wreck?? Nah, just some miniatures ;)

Hello again blogland! Been quite some time.... Oh well... our wedding has been keeping me busy. And on top of everything I got food poisoning last week... been in bed almost the whole week. The good thing is that I'm feeling much better now and am able to continue with the wedding preparations :)

In the last couple of weeks I wasn't able to take a lot of time for minis but I did squeeze in an hour here and there. This is what I've was able to do so far....

I finally decided on painting the shop front of my house blue. It's a bit hard to see the exact colour here but I do like how it turned out. 

After the paint dried I distressed it to make it look less shiny and older. Sadly I didn't remember to take a picture... next time, I promise :)

The upper windows will also be blue... A little more and the front should be complete. 

I also started working on a coffered ceiling for the first floor. Here are my very professional tools, hehehehe. I can't remember how many times clothes pins saved me time in miniature :)

Besides working on the house I've also asked my dad to make me a corner for a little vignette. I saw this on a few blogs and thought it would be the perfect way to test gluing wallpaper and a little excuse to start on a new project. I like to think a lot of us miniaturists are the same.... having multiple projects going on at once and always looking for new ones :D

The little corner is nothing special... 20cm x 20 cm and about 23cm tall.

I decided on a simple wallpaper for two reasons: 
- the only thing I had at home was scrapbooking paper
- I'd have to order dollhouse wallpaper from abroad an right now I just don't have the finances to found such a purchase (because of course everyone knows that you don't just order two or three sheets of wallpaper). 

I think it turned out pretty good for my first try. I had to use two sheets of paper although I'm not all that bothered by the seam. Once the furniture is in I don't think it will be all that noticable. 
I'm thinking of making Flourish & Blotts bookshop. Whenever I start making something it's always Harry Potter related.... I wonder if I'll ever get sick of Harry Potter and wizard stuff.... probably not, hehehee

I believe this is it for now. We've also been tidying up around our real life house... have to make it look at least presentable for the wedding, right? Not long now.... Ooh, I can't wait! :D

Until next time!

*Poof*


January 22, 2014

What kind of shop will this turn into?

First off.... a very warm thank you for all of your wonderful comments, both on the engagement and the dollhouse. I appreciate each and every one of you and I love getting feedback on my projects! You're the best!

I'm very happy to report that we've been making some progress our project :) The house is coming together quite nicely so far.

First we dry fitted the shell of the house. Fits like a charm! We had to mitre the top sides so the roof will sit on the sides like it's supposed to. We also cut the roof to size and dry fitted it but I didn't snap any pictures of that.

And the front facade. We cut out all the openings for windows and the front door plus the upper curves. I couldn't believe how it transformed everything! A few cuts and everything starts looking more and more like a dollhouse and less like a large wooden box.

We glued and clamped each piece individually to the facade and had to wait for the glue to dry. Here you can see the bevelled edge for the lowest part of the shop. It turned out exactly as it should. We didn't have any problems with this one as it's quite thick and wide,

The shop window is getting it's form also.....

And here is the complete shop window. We added two types of bevelled wood for the frame of the window. I was a bit worried because these are quite narrow and there is only a few millimetres between each edge but with some trial and error we managed to figure these out too. The thing is that my dad only has router knives that are used in real life furniture and so we had to try a few of them to get the effect we wanted. Thankfully we can set the router to cut at any thickness and as far into the wood as we want. Although we still have to set it manually and sometimes that takes a few tries to get it right.

The door isn't finished yes but you can also see the foundations for the two pillars, one on each side. These will get a moulded piece glued on top of this piece so they will stand out even more.

Here you can see a bit more detail to the window. I thought this was the hard part until we started working on the upper windows which require even thinner strips of wood. But more on that next time....

Today I finally found the right "plexi glass" for the windows. It's 2mm thick, just like the book says so I'm very excited. Now we need to cut that to size and try it on the windows. Can't wait!

Although now I need your advice my friends..... I have a very hard decision ahead. I need to think of what the shop will look like, at least from the outside. We can't start on the upper windows until I decide how I want the entire facade to look. I do know that the lower part of the house (aka the shop) will be a dark brown colour (an imitation of wood) after staining. Now I have to decide on the upper floor. I was thinking about a light cream or dirty white for the facade and the same dark brown for the windows. Also I have to figure out some way to make a slightly grouted finish like in real houses on facades. Any suggestions on that? I would love any and all advice you might have for me about the colour and the grouting, since I'm such a newbie at this.

Also, I still haven't decided what exactly I would like the shop to be. One option (which I'm leaning heavily to) is a Harry Potter/magical themed shop. This would mean turning it into a shop on both levels plus a little storage room in the attic. They would stock everything from Bertie Bott's Every Flavour Beans, cauldrons, dragon eggs to potions and herbs.

Another option is to turn the house into a general goods shop downstairs and have a small living room or bedroom upstairs. Although I don't like this idea as much.... But I would love to know what you think!

I think this is it for now. Between finishing my thesis, all the wedding planning going on and the lantern project from a few posts ago I think we're making good progress on the house. All in all it's been a productive few weeks.

Until next time! 

*Poof*


January 2, 2014

Happy 2014!!

First of all I would like to wish everyone a very happy New Year! Of course with all the usual wishes of health and happiness..... although I would like to add one more - lots of mini time and inspiration.

For me the year started spectacularly!! My boyfriend asked me to marry him at the stroke of midnight on New Years Eve! I can't believe I didn't suspect a thing :) Of course I couldn't believe my eyes when he kneeled and produced a ring... I must confess that although there were supposedly countless fireworks I didn't see any of them ;)

As for my miniature world, this year also started out great.....

I found this book on eBay and snatched it up for 2.5 pounds! I couldn't resist! I've wanted to make a roombox since we don't have that much extra space (with all my mini making supplies crowding our room, hehehe). But when I got this book I couldn't resist. So my father promised to help me build one. I chose the Victorian shop, mainly because it's supposed to be the easiest to build and it takes up the least amount of space. Plus we can always make others and since this is the first dollhouse (or anything remotely like it) we're going to build it's best to start small, right?

This is the start..... It's going to be made from 10mm plywood. We cut all the pieces to size and then started marking out the front.

Our work space.... 

My father gluing together the sides of the dollhouse. We decided to improvise a bit here and glued pieces of 5mm plywood together. We figured it would be easier than to cut the grooves for the floors out so precisely. We'll see if this was a good idea or not. Worst case scenario we can still replace these with the 10mm plywood if this method doesn't work out.

We still have a ton of work to do but it's a start. I can't believe I'm going to have my own dollhouse! Wow! Now I need to decide what kind of shop it will be. Any ideas? And then I need to pick out a wallpaper and figure out how to decorate the inside before we glue everything together. But I still have some time to decide since we will focus on the front panel for now.

And because I couldn't resist, here's a picture of my engagement ring.....my future husband picked out this white gold ring with a sapphire. I love it!


Until next time!

*Poof*